Home » Posts tagged 'roofer'
Tag Archives: roofer
Choosing the Right Roofing Materials
A roof (or rooves) is the top covering of a building that protects against rain, snow, sunlight, and extreme temperatures. Choosing the right roofing materials is crucial to a structure’s longevity and durability.
Metal roofing comes in a variety of shapes, looks, and styles. It’s also an energy-efficient option. Contact Prestige Exteriors now!

Shingles are the decorative, sturdy covering for a roof and provide a layer of protection to whatever material lies beneath them (typically plywood or a vapor barrier). They have many different styles, designs, colors and shapes but all do the same thing: protect your home.
Shingle materials include wood, slate, asphalt and fiberglass. The most popular in the US is the asphalt shingle, which comes in a range of shapes, sizes and colors. This shingle is made up of layers that are adhered together with laminant at the time they are manufactured.
In some cases, these layers are coated with a special mineral granule material, which provides added fire resistance and other performance characteristics to the shingle. These granules also give the shingles their unique color and appearance, which can enhance any design aesthetic.
Depending on the manufacturer, shingles may also have a reflective coating to help reduce heat transfer into the house and/or energy costs. Lastly, some types of shingles are designed to be more durable, providing a longer lifespan than traditional asphalt shingles.
These durable shingles are called architectural shingles and can last up to twice as long as a traditional 3-tab shingle. They are thicker and more rugged than regular shingles and can add a more complex, dimensional look to any roof.
Before laying the shingles, a layer of underlayment and valley flashing should be applied. If the roof is designed with open or closed valleys, these should be finished at this time too. For open valleys, IKO recommends a pre-formed width of corrosion-resistant metal. If the roof will have closed valleys, the ice and water membrane should be installed now. This membrane helps prevent water and ice from building up between the eaves, protecting the underlayment and shingles. It is important to apply a complete bed of asphalt plastic cement under each section of overlap and nail the shingle into place at least 50 mm (2’’) back from the chalk line. The shingle should then be sealed with a spot of heat-activated asphalt sealant to ensure the roof is waterproof and resistant to wind and other roof stresses.
Felt
Felt is a type of fiber that’s been used in manufacturing for many years and continues to be popular in the roofing industry as a material to lay under the shingles. Often called “tarpaper,” it’s an underlayment that sits between the roof deck and the shingles and provides protection from rain, wind, and snow. Depending on the thickness, it’s also able to reduce the amount of moisture that permeates into the roof deck, helping the home maintain its insulative value and lower energy bills.
Felt can be manufactured in either organic materials like wood cellulose or more synthetic options including polyester and fiberglass felts. These types of felt can be soaked in waterproof materials such as asphalt or bitumen to make it more durable against the elements. In addition, some manufacturers even add fire retardants to help reduce the chance of a fire under the shingles.
The main benefit of using felt underlayment is that it can protect against moisture that can seep into the wood of the roof deck causing damage and a potential for water leaks in your attic or home’s interior. It’s also a great backup layer in case a shingle becomes damaged by heavy rain or hail during stormy weather, keeping the area protected from moisture and allowing the water to escape the roof.
When it comes to installing felt, it’s important to follow the directions provided by the manufacturer for specific guidelines based on the roofing materials being installed. Typically, it’s a multi-step process that involves laying and overlapping the felt to ensure proper installation and sealant. Additionally, it’s a good idea to have the proper tools to handle the roofing felt for safety and convenience.
The most important aspect of installing felt is being sure to choose the right thickness for your project. Usually, there are different grades of roofing felt that are available and they are separated by their weight: 15 lb felt for lighter projects and 30 lb felt for heavier duty projects. The higher the weight of the felt, the stronger it is.
Underlayment
Underlayment is an important roofing component that protects the structure of your roof from water damage and offers additional protection against weather-related issues like ice dams, mold, mildew, and more. It is installed directly onto the wooden boards that form the skeleton of your roof, known as the roof deck. These boards, which may be made from plywood, OSB, or step sheathing, are attached to the rafters or trusses and serve as the primary support system for your roof covering.
In areas that experience high winds, it’s often necessary to reinforce your roof with underlayment. This material acts as a barrier between the roof sheathing and your shingles, creating an extra layer of defense against damaging winds. In addition to its wind-resistant properties, synthetic underlayment can be more effective in preventing leaks and allowing water to drain properly in the event of a heavy rainfall.
There are many different types of underlayment available, ranging from felt to cork to synthetic options. Some are lightweight and designed to be easy for workers to install, while others provide a non-skid surface for safer roofer footing, or feature breathable technology that prevents trapped moisture from developing into mold or mildew within your home.
Felt underlayment is typically fastened to the roof sheathing with staples, and it’s sometimes reinforced with plastic windstrips in areas that are located in high-wind zones. Felt underlayment is prone to deterioration and must be replaced as soon as possible if it becomes damaged or if your home is in an area that experiences frequent hailstorms.
Synthetic underlayment is a more durable option that can be a better choice for homes in higher-wind regions. It’s also less prone to fungus growth, and some are wrinkle-free, while offering a more even and sturdy surface for installing shingles. It’s important to follow proper installation instructions for your specific underlayment, as failure to do so may void your roofing manufacturer’s warranty.
Some underlayment products are even crafted as a combination of both a waterproofing membrane and a foil moisture vapor barrier, eliminating the need for two separate products. This streamlined solution is also lighter and easier to work with, saving you both time and money during your roof installation or reroofing project.
Flashing
Flashing is thin pieces of impervious material installed at critical points in a roof. Often made of galvanized steel, it’s used to seal the edges and joints in areas where water is prone to leaks. These include the places where roof planes meet vertical surfaces like walls, chimneys and skylights, and the edges of protrusions such as vents or pipes.
Without flashing, these areas can let rain seep into a home and cause mold, mildew and other problems. Flashing prevents this by directing the rain away from these areas and into a gutter or down the side of the building.
There are a number of different types of flashing, each serving a specific purpose. For example, step flashing consists of rectangles of sheet metal bent into an “L” shape with the base nailed to the roof and the top nailed to the vertical wall of a dormer or a chimney. The overlapping “steps” of this type of flashing allow rainwater to flow down to the shingles and into a gutter, rather than into the home.
Another type of flashing is counter-flashing, which consists of two pieces of flashing material that overlap each other in a series of “steps”. This is a common type of flashing for chimneys, where the base of the flashing sits around the bottom of the chimney to protect it from rainwater that would otherwise flow directly over the shingles and into the home.
Other kinds of flashing include headwall flashing, which is a piece of metal bent into an “L” shape and nailed to the headwall (where the edge of a roof meets a wall) and over a course of shingles. Sill flashing is a concealed flashing placed under doors and windows to prevent water from entering walls at those points. Through-wall flashing spans the thickness of a wall and directs rainwater into weep holes.
Other flashing is designed to seal the seams of roof penetrations such as plumbing vents and roof skylights. Roof penetration flashing is also available in stainless steel to provide longer-lasting protection than tar-based products. Buildings in high-wind regions need flashing that is able to resist uplift, and this is usually achieved through the use of a thicker gauge of metal and careful installation.
Roofing – The First Line of Defense Against the Elements
The roof encloses the interior space of a house, protects it from weather elements and adds to its appearance. A well maintained roof also increases the value of a home.
A roof can be flat or have a slope. It may have a gable shape with two sides that meet at the ridge or a hip roof with three sides. Contact Roofing Corpus Christi TX now!
When you’re looking to have your roof replaced, it’s important to choose a sturdy material that will add value to your home. A good roof will also protect your house from rain, snow and other elements. There are many different types of roofing materials to consider, each with its own strengths and weaknesses. Some are better suited for certain climates than others, while other roofing materials can enhance the aesthetic of your house.
One of the most popular and attractive roofing materials is wood. It looks lovely on classic and historic-style homes, such as Cape Cod cottages or Craftsman houses. There are two basic types of wood roofs, shingles and shakes. Shingles are thin slabs that are produced by precise sawing, while shakes are thick wedges that have a rougher texture. Both shingles and shakes can be stained to match the color of your house. Wood is not as long-lasting as other roofing materials, especially in damp climates, but it can last a lifetime if well maintained.
Metal roofing is a durable option that has been known to last up to 50 years. It’s available in several styles, including standing seam and shingle look-alikes. One of the newest roofing materials is composite shingles, which are made from recycled plastic and rubber. These are a great alternative to wood or slate roofs, as they have the same look but come in at a more affordable price point.
Concrete tiles are another durable roofing material that is suitable for a range of climates. They’re fire-resistant, moisture-proof and can resist wind damage. They’re available in a wide range of colors and are less expensive than clay tiles.
For flat or low-pitch roofs, a membrane roofing system is an excellent choice. This type of roof is typically made with EPDM, a synthetic rubber sheeting. It’s affordable, easy to install and repair, and offers excellent durability.
Rolled roofing, which is a single piece of black or tan canvas that’s nailed to the roof, is another roofing option. It’s affordable, but doesn’t add much to the resale value of your house.
Roofing Installation
The roof is one of the most important aspects of a home, protecting it from rain, snow, sunlight, wind, and extremes of temperature. It’s also a major investment. While any part of your house can be damaged by the elements, it’s typically your roof that takes the brunt of the abuse. That’s why it’s so important to choose the right material and have it installed properly.
Before any roofing work can begin, the crew will need to get set up. This involves finding the access point, getting their tools ready, and doing whatever else is necessary to prepare the property. The crew will also cover your yard, pool or deck, and move any items that may be in the way of the workers. Tarps will then be attached to the roof and wooden boards will cover any areas that may be harmed by debris falling from the roof during the reroofing process.
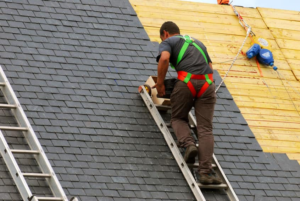
Once the protective coverings are in place, the roofing crew will begin working on the most visible element of your new roof–the shingles. The shingles will be laid in layers, staggered, and nailed in. This is an artful, time-consuming process that requires a certain amount of skill. A top-notch roofer will take care to do a beautiful job that keeps the weather elements out and your family comfortable.
Additional protection for your roof can be added with flashing, a metal material that’s placed around chimneys, windows, and any other joints. Specialty shingle caps are also available for the ridge of your roof to provide both a finished look and extra moisture and wind resistance. Finally, soffit and gable vents are added to remove moisture and heat from the attic, regulate the temperature in your home, and reduce energy costs.
Roofing Repair
While any part of the house takes a beating from the elements, the roof is typically where the heaviest assaults are experienced. Rain, hail, sleet, snow, bitter cold, hot sun, and the occasional flying object or fallen tree can all take their toll.
Repairing a roof isn’t as simple as just replacing the damaged shingles, though. Depending on the roofing materials and extent of the damage, it could take several days to complete a full reroofing job.
The first step is assessing the damaged area, which will usually be apparent from within the home. Look for stained ceilings, deteriorating insulation, or other signs of leaks. You may also notice that some areas of the roof are warmer or cooler than others, which can be a sign of roof damage.
Next, remove any debris that’s blocking access to the damaged areas of the roof. If the flashing (thin metal that’s often hand-bent around parts of the roof, like pipes) is damaged, try to remove any nails and sealant from it, then re-bend and re-seal it.
Roofing Maintenance
Your roof is the first line of defense between your living environment and outside elements. Even small problems can escalate quickly, becoming expensive to repair. Regular maintenance by a qualified roofing professional can prevent these issues and help you avoid costly repairs down the road. During a maintenance visit, the roofing professional can inspect the entire roof and document conditions with a checklist. The checklist will be tailored to each individual facility. It will include pictures, roof dimensions and applied systems. A detailed inspection of the flashings (where a majority of leaks originate) should also be done. Lastly, the field should be inspected for surface wear, lap integrity and overall degradation.
The gutters should be inspected and downspouts cleared of debris to ensure proper flow of water. Trimming large tree limbs that hang over the roof can be a good way to protect it from damage during heavy storms and natural disasters.
They Have Financing Options
Roofers help keep buildings protected by installing, repairing, or replacing their roofs. They work with a variety of materials, including shingles and bitumen. This in-demand career is perfect for people who enjoy climbing to high heights, working with their hands, and solving problems. Typically, roofers complete a high school diploma and pursue an apprenticeship or trade school to learn their craft. Some even have specialized certifications for specific types of roofing.
Many roofers offer financing for their services. Large, nationwide companies often have their own in-house financing providers. This helps make the entire process easier for homeowners, as they can get approved and receive funds in as little as 24 hours. These companies also tend to have lower interest rates than credit cards, and you won’t be penalized for paying back your loan early.
Besides offering their own financing, most roofers partner with third-party lenders to provide loans for roofing projects. Some lenders, like Upgrade, specialize in home improvement financing, so they know what it takes to finance a roof project. Their online application is easy, and they don’t charge a prepayment penalty for paying your loan off early.
If you’re not comfortable with a personal loan, you may be interested in a home equity line of credit (HELOC). Similar to a credit card, you can borrow up to a certain limit, and the interest you pay is tax-deductible. However, HELOCs require you to pledge your home as collateral, so it’s best used for long-term or surprise expenses.
Another option is to use a credit card with 0% interest for six or 12 months. This can be a good way to fund your roof, but you should be aware of the APR after that promotional period ends. Additionally, most credit cards will charge a transaction fee when you make a purchase, which can add up over time.